How to Create a Custom Property Editor for a Custom Apex Action in Salesforce Flows
Introduction
Apex Actions are a great way to extend flows in Salesforce with custom code to meet your specific needs. They enable admins to orchestrate complex business processes with Flow Builder and leverage Apex to do the heavy lifting where needed. A nice enhancement coming to Flow Builder in Spring ‘21 is the ability to customize an Apex Action with a Custom Property Editor to make configuring them easier.
What is a Custom Property Editor?
A Custom Property Editor (CPE) is a custom Lightning Web Component (LWC) that can be used as the user interface when you configure an Apex Action in the Flow Builder. These components implement specific JavaScript properties so that it can communicate with Flow Builder. Leveraging a custom LWC component for configuring Apex Actions allows developers to build powerful yet simple user interfaces for admins to use when leveraging the action in a flow.
You can learn more about how they work with Apex Actions and how they work with Flow Builder in the Lightning Web Components Dev Guide.
Code Example
We need a custom Apex Action and a custom LWC component to demo a CPE.
The CustomGreetingAction Apex class contains the invocable method for our Custom Greeting custom Apex Action.
# CustomGreetingAction.cls
public class CustomGreetingAction {
    public class Request {
        @InvocableVariable(label='Exclamation' description='The `Hello` in Hello World!' required=true)
        public string exclamation;

        @InvocableVariable(label='Name' description='The `World` in Hello World!')
        public string name;

        @InvocableVariable(label='Punctuation' description='The `!` in Hello World!' required=true)
        public string punctuation;
    }

    public class Result {
        @InvocableVariable(label='Greeting' description='The generated greeting.')
        public string greeting;

        @InvocableVariable(label='Error Message' description='The error message generated.')
        public string errorMessage;
    }

    @InvocableMethod(label='Custom Greeting' description='A custom action that generates a greeting based on the inputs.' category='Custom' configurationEditor='c-custom-greeting-cpe')
    public static List<CustomGreetingAction.Result> processRequests(List<CustomGreetingAction.Request> requests) {
        List<CustomGreetingAction.Result> results = new List<CustomGreetingAction.Result>();

        for (CustomGreetingAction.Request request : requests) {
            Result result = processRequest(request);

            results.add(result);
        }

        return results;
    }

    private static CustomGreetingAction.Result processRequest(CustomGreetingAction.Request request) {
        Result result = new Result();
        string exclamation = request.exclamation;
        string name = request.name;
        string punctuation = request.punctuation;

        try {
            result.greeting = generateGreeting(exclamation, name, punctuation);
        } catch (Exception ex) {
            result.errorMessage = ex.getMessage();
        }

        return result;
    }

    private static string generateGreeting(string exclamation, string name, string punctuation) {
        string greeting = exclamation;

        if (name != null) {
            greeting += ' ' + name;
        }

        greeting += punctuation;

        return greeting;
    }
}
The customGreetingCpe HTML template contains the markup for our custom-greeting-cpe LWC component.
<!-- customGreetingCpe.html -->
<template>
    <lightning-combobox
        name="exclamationCombobox"
        label="Exclamation"
        value={exclamation}
        placeholder="Select an Exclamation"
        options={exclamationOptions}
        onchange={handleExclamationChange} ></lightning-combobox>

    <lightning-input
        type="string"
        label="Name"
        placeholder="Name to greet..."
        value={name}
        onchange={handleNameChange}></lightning-input>

    <lightning-combobox
        name="punctuationCombobox"
        label="Punctuation"
        value={punctuation}
        placeholder="Select a Punctuation"
        options={punctuationOptions}
        onchange={handlePunctuationChange} ></lightning-combobox>
</template>
The customGreetingCpe JavaScript class contains the properties, methods, and event handlers for our custom-greeting-cpe LWC component.
// customGreetingCpe.js
import { api, LightningElement } from 'lwc';

export default class CustomGreetingCpe extends LightningElement {
    @api
    inputVariables;

    get exclamation() {
        const param = this.inputVariables.find(({ name }) => name === 'exclamation');

        return param && param.value;
    }

    get exclamationOptions() {
        return [
            {label: 'Hello', value: 'Hello'},
            {label: 'Hola', value: 'Hola'},
            {label: 'Hallo', value: 'Hallo'}
        ]
    }

    get name() {
        const param = this.inputVariables.find(({ name }) => name === 'name');

        return param && param.value;
    }

    get punctuation() {
        const param = this.inputVariables.find(({ name }) => name === 'punctuation');

        return param && param.value;
    }

    get punctuationOptions() {
        return [
            {label: '.', value: '.'},
            {label: '!', value: '!'},
            {label: '?', value: '?'},
            {label: '?!', value: '?!'},
        ]
    }

    validateExclamation() {
        if (this.exclamation) return;

        const errorString = "Exclamation is required.";
        const element = this.template.querySelector('lightning-combobox.custom-greeting-cpe__exclamation');
        element.setCustomValidity(errorString);
        element.reportValidity();

        return {
            key: 'exclamation',
            errorString: errorString,
        }
    }

    validatePunctuation() {
        if (this.punctuation) return;

        const errorString = "Punctuation is required.";
        const element = this.template.querySelector('lightning-combobox.custom-greeting-cpe__punctuation');
        element.setCustomValidity(errorString);
        element.reportValidity();

        return {
            key: 'punctuation',
            errorString: errorString,
        }
    }

    @api
    validate() {
        const validity = [];
        const validateExclamationResult = this.validateExclamation();

        if (validateExclamationResult) {
            validity.push(validateExclamationResult);
        }

        const validatePunctuationResult = this.validatePunctuation();

        if (validatePunctuationResult) {
            validity.push(validatePunctuationResult);
        }

        return validity;
    }

    handleExclamationChange(event) {
        this.handleChange(event, 'exclamation');
    }

    handleNameChange(event) {
        this.handleChange(event, 'name');
    }

    handlePunctuationChange(event) {
        this.handleChange(event, 'punctuation');
    }

    handleChange(event, name) {
        if(event && event.detail) {
            const newValue = event.detail.value;
            const valueChangedEvent = new CustomEvent('configuration_editor_input_value_changed', {
                bubbles: true,
                cancelable: false,
                composed: true,
                detail: {
                    name,
                    newValue,
                    newValueDataType: 'String',
                },
            });

            this.dispatchEvent(valueChangedEvent);
        }
    }
}
Code Review
All right, let’s review the important parts of the code above!
Apex Action
I covered custom Apex Actions in a previous post. I’ve used the same one from that post here with one difference: I added the configurationEditor Property to the @InvocableMethod Annotation on the CustomGreetingAction Apex Class. This property tells Flow Builder which LWC component to use as the CPE for this Apex Action instead of using a Standard Property Editor (SPE).
You can learn more about the configurationEditor property and @InvocableMethod annotation in the Apex Developer Guide.
Displaying and Updating Inputs
Inputs from the Apex Action are passed to the LWC component’s JavaScript class through the inputVariables interface and each input is exposed as a dynamic property in the component’s JavaScript class that the component’s HTML template can bind to. The table below illustrates the relationship between the elements:
| Apex Class | JavaScript Class | HTML Template |
|---|---|---|
@InvocableVariable properties |
inputVariables property to input dynamic property |
{input} variable binding |
The inputVariables property implements the inputVariables interface for the CPE. This allows the LWC component to accept the inputs from the custom Apex Action. It is an array that provides data about each of inputs. This means each property with the @InvocableVariable annotation is added to the array. The inputVariables property for the CustomGreetingAction from the demo in our custom Apex Action article would look like this:
[
    {
        name: 'exclamation',
        value: 'Hello',
        valueDataType: 'String'
    },
    {
        name: 'name',
        value: 'World',
        valueDataType: 'String'
    },
    {
        name: 'punctuation',
        value: '!',
        valueDataType: 'String'
    }
]
We use the inputVariables property to expose the value of the inputs to the custom Apex Action through dynamic properties on the customGreetingCpe JavaScript class.
This allows us to bind to them in our HTML template. Here we are exposing the exclamation input from our custom Apex Action as the exclamation property on our custon JavaScript class:
get exclamation() {
    const param = this.inputVariables.find(({ name }) => name === 'exclamation');

    return param && param.value;
}
Here we are binding the exclamation property to the value attribute of the exclamationCombobox <lightning-combobox> component:
<lightning-combobox
    name="exclamationCombobox"
    label="Exclamation"
    value={exclamation}
    placeholder="Select an Exclamation"
    options={exclamationOptions}
    onchange={handleExclamationChange} ></lightning-combobox>
At this point we’re displaying the value from the input in the UI. In order to update the value, we need to leverage the configuration_editor_input_value_changed CustomEvent.
The configuration_editor_input_value_changed CustomEvent is used to propagate the value change back to Flow Builder. We use an onchange event handler on the UI elements to dispatch the custom event. You can see in the HTML markup above we’ve bound the onchange event for the exclamationCombobox component to the handleExclamationChange event handler.
In the handleExclamationChange event handler to pass the event object and Apex Action name to the handleChange event handler:
handleExclamationChange(event) {
    this.handleChange(event, 'exclamation');
}
Finally, in the handleChange method we create and dispatch the custom event with the value for the Apex Action input:
handleChange(event, name) {
    if(event && event.detail) {
        const newValue = event.detail.value;
        const valueChangedEvent = new CustomEvent('configuration_editor_input_value_changed', {
            bubbles: true,
            cancelable: false,
            composed: true,
            detail: {
                name,
                newValue,
                newValueDataType: 'String',
            },
        });

        this.dispatchEvent(valueChangedEvent);
    }
}
You can learn more about the inputVariables interface in the Lightning Web Components Dev Guide.
Custom Validation
We could have simply added the require attribute to the exclamationCombobox and punctuationCombobox components to enforce an admin to set these values. This would work for simple scenarios but for complex scenarios custom validation will be important.
The validate() method implements the validate interface for the CPE. This allows for custom validation within the CPE when the admin clicks on Done in the Flow Builder’s screen editor. Flow Builder will display the number of errors but not the actual error message. Display the error messages within the CPE.
Here you can see the validate() method calls both the validateExclamation() and validatePunctuation() methods to validate our properties for the inputs to the custom Apex Action and if they are set, adds them to the validity variable to be sent back to the Flow Builder:
@api
validate() {
    const validity = [];
    const validateExclamationResult = this.validateExclamation();

    if (validateExclamationResult) {
        validity.push(validateExclamationResult);
    }

    const validatePunctuationResult = this.validatePunctuation();

    if (validatePunctuationResult) {
        validity.push(validatePunctuationResult);
    }

    return validity;
}
In the validateExclamation() method we check the exclamation property to see if it’s set. If it is, we return null otherwise we lookup the element and use the setCustomValidity() method to display an error in the UI next to the element and then return an object with a key and errorString to send back to Flow Builder:
validateExclamation() {
    if (this.exclamation) return;

    const errorString = "Exclamation is required.";
    const element = this.template.querySelector('lightning-combobox.custom-greeting-cpe__exclamation');
    element.setCustomValidity(errorString);
    element.reportValidity();

    return {
        key: 'exclamation',
        errorString: errorString,
    }
}
Again, Flow Builder doesn’t display the errorString, just the number of errors there are. Leveraging the setCustomValidity() method on each component is a natural way to give feedback to the admin configuring the action creating a better user experience.
You can learn more about the validate interface in the Lightning Web Components Dev Guide.
Demo
Alright, lets take a look at our CPE. We’re going to build the same flow we built in a previous post that looks like this: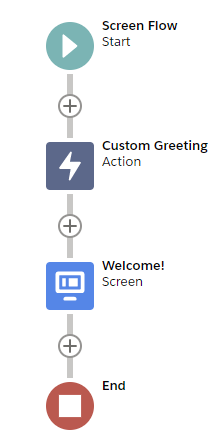
Once I’ve added an Action to my flow and selected the Custom Greeting action from the Custom category, our CPE is shown instead of the SPE: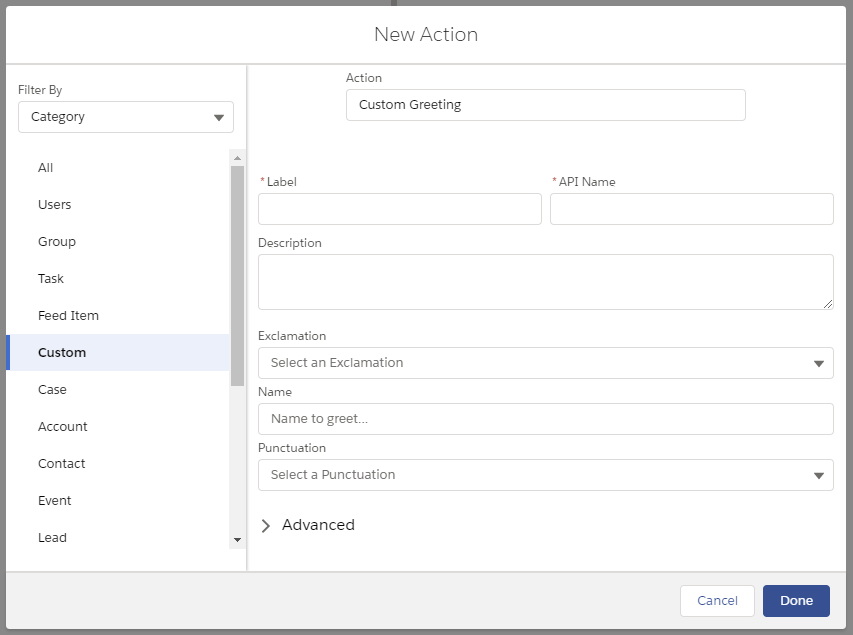
Here’s what it looks like with the SPE: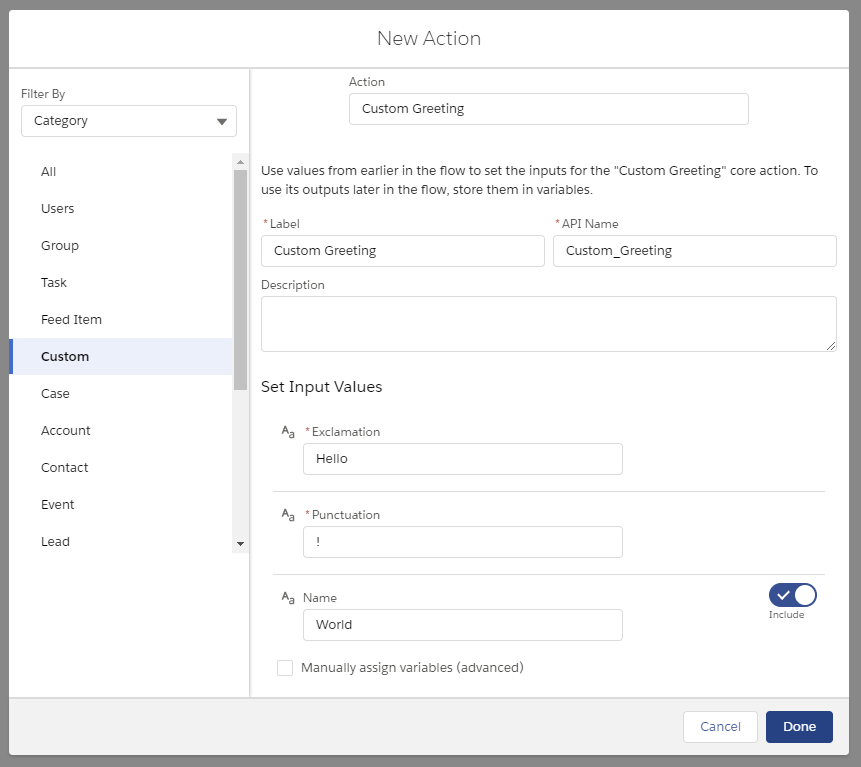
The Label, API Name, and Description fields are the same but the fields for Exclamation, Punctuation, and Name look different. They’ve rendered as the standard <lightning-combobox> and <lightning-input> components!
First, we’ll fill in the Label and API Name fields and then click Done. This triggers our custom validation: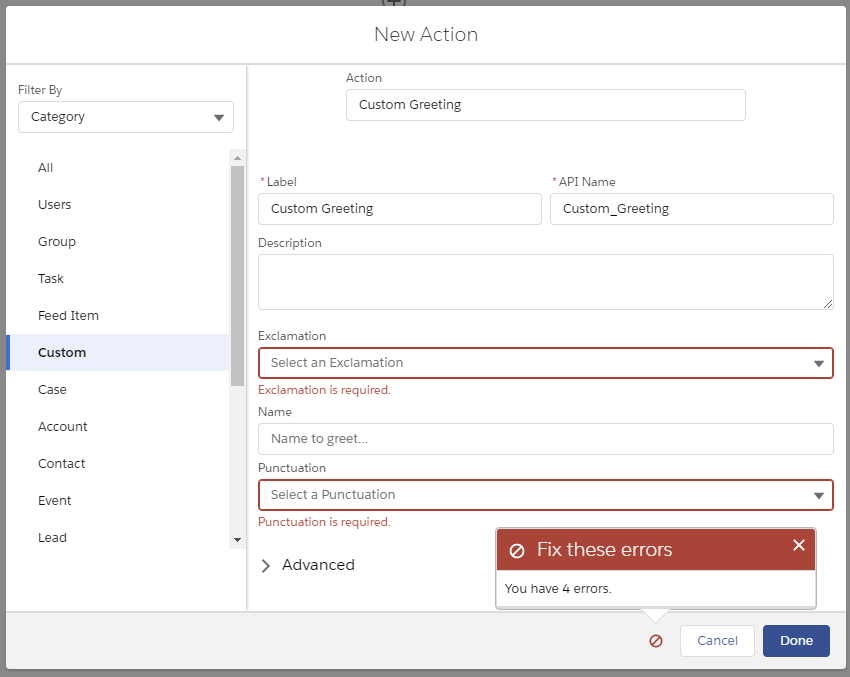
What you’ll notice is that it is reporting 4 errors instead of 2 errors. That’s because it’s counting the error for the required inputs on the Apex Action as well as the custom errors we added to the Exclamation and Punctuation fields.
Next, we’ll select “Hello” for the Exclamation field and enter “world” into the Name field and click Done. This triggers our custom validation again: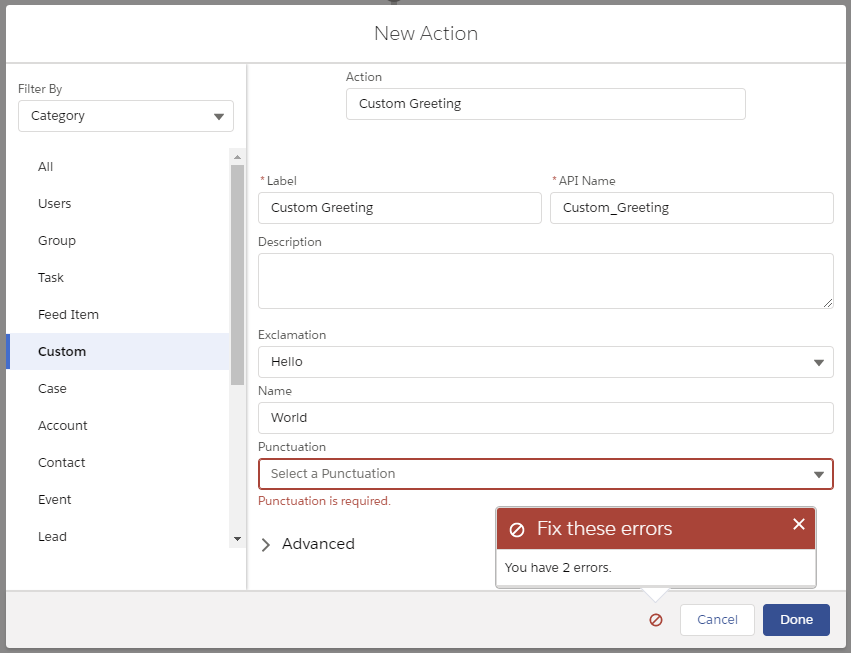
You can see that the error for the Exclamation field has been cleared but the error for the Punctuation field has not.
Let’s select “!” for the Punctuation field and click Done. Validation passes and we return to the Flow Builder canvas.
OK, let’s add a Screen element to our flow to display our greeting. Edit the screen flow to look like the following: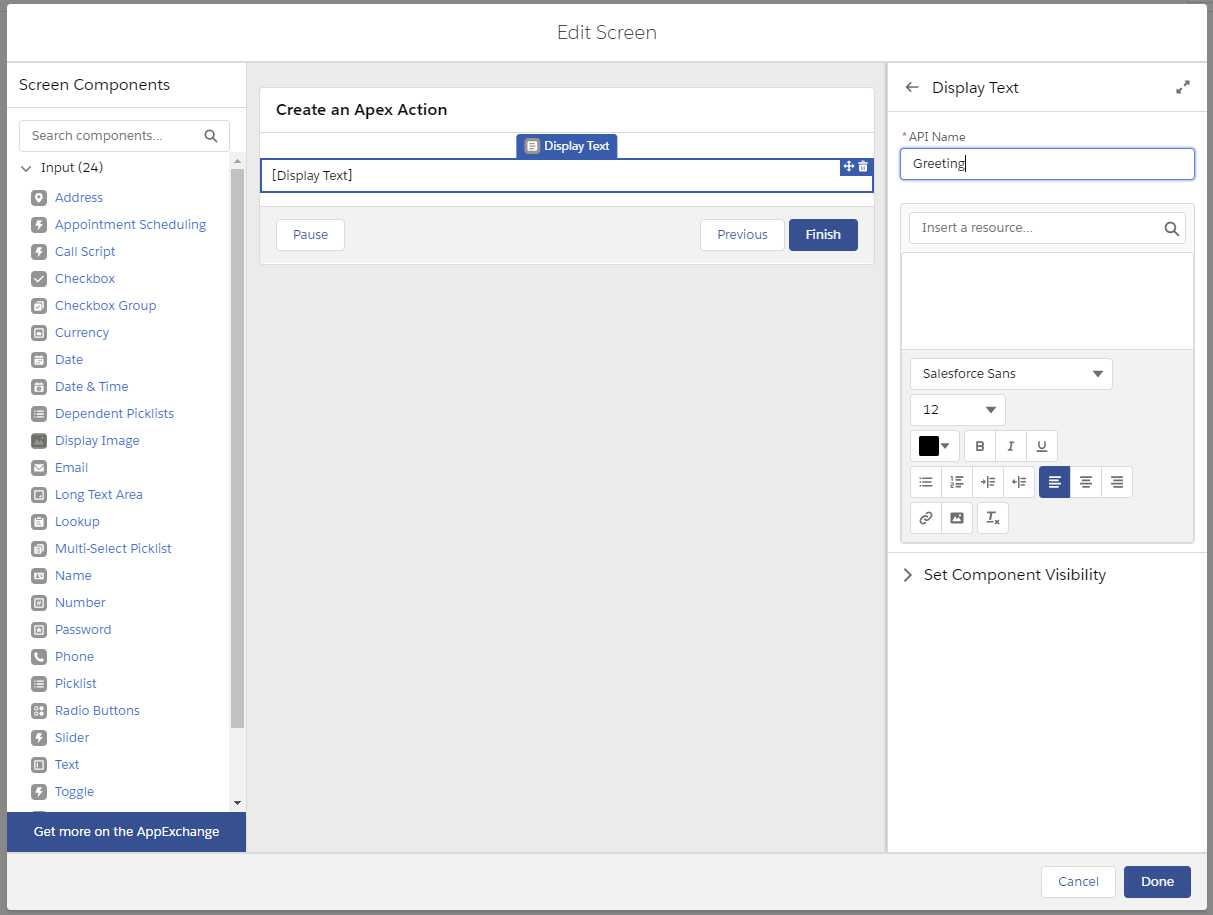
Add a Display Text component and named it “Greeting”. We’ll use this component to display our greeting. Click on the Insert a resource… input to show the list of available resources in the flow: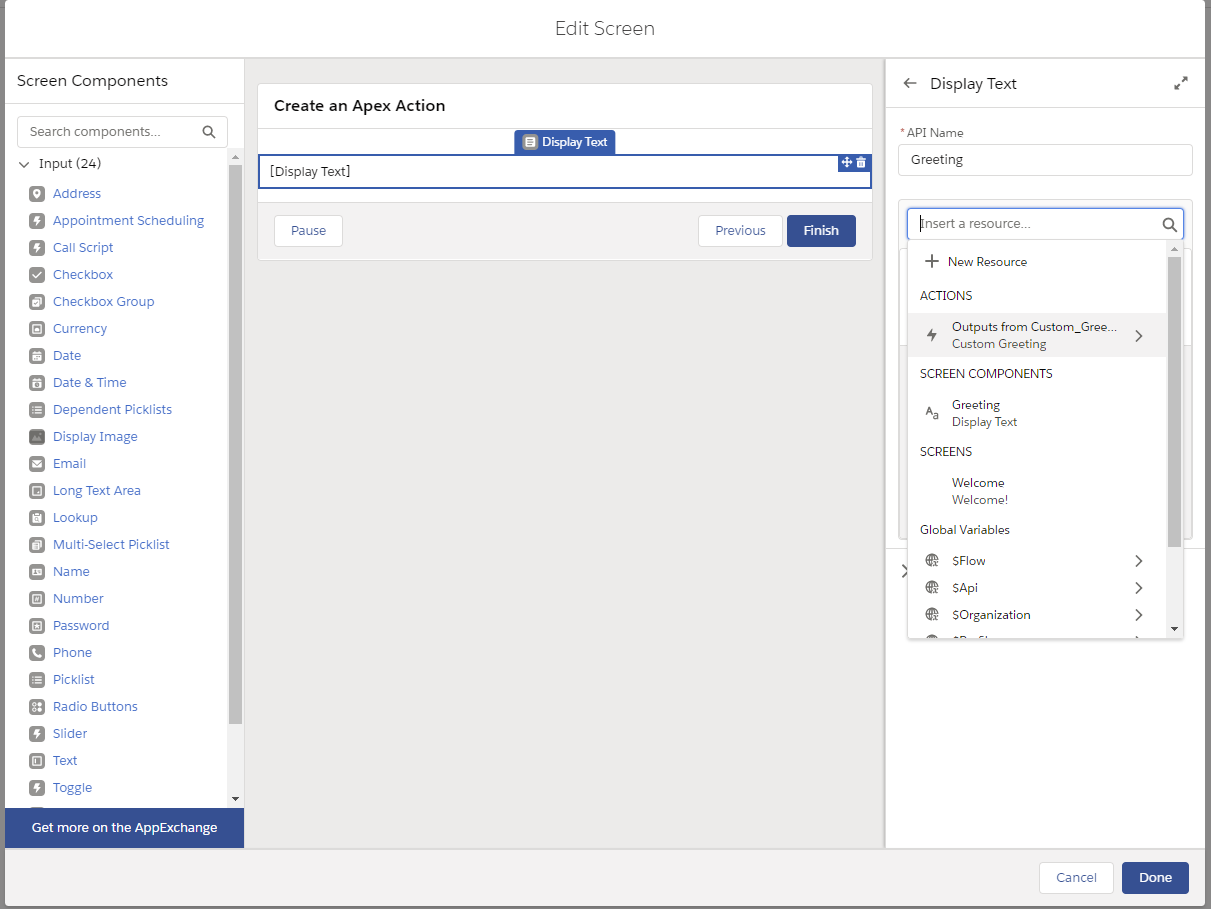
Underneath the ACTIONS heading in the dropdown click on the Outputs from Custom Greeting option. This will display the available outputs from our action:
Click on the greeting option to insert it into the rich-text editor:
Alright, save your flow with the default options and click Debug in the header. Accept the defaults in the Debug the flow dialog and click Run. You can see that Hello World! is rendered on the screen: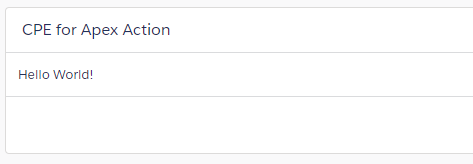
and you can see the details for our custom Apex action in the Debug Details: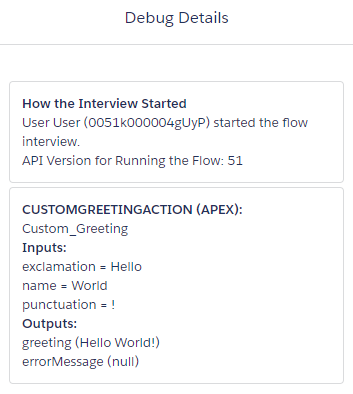
Here you can see that our CPE successfully updated the inputs to the custom Apex Action.
Final Thoughts
Custom Property Editors are a powerful customization developers can make to simplify the configuration of custom Apex Actions in Flow Builder for admins. This creates a better experience for the admin using the custom Apex Action and can reduce errors caused by incomplete settings and bad data leading to better results from your flows. I look forward to exploring more advanced scenarios in future blog posts!